Key:
Tanaka
Georgina
Kieran
Final Cut Pro:
Editing was one of the skills we learned and developed along the way. The skills that we have learned and honed along the way are things like cutting and moving sequences around, we began to develop this skill by making sure that when we cut or moved sequences that continuity was created to make the story make sense to the audience. We had also learned how to add titles to our sequences but integrating them into the background to fit the genre of our film (thriller) was the hard part but we eventually learned how to do it. It is done by adding the 3D effect to you titles and if you want to be more advanced you can create individual letters for you title an layer them on top of each other to make them seem as they bend with the environment like the example up top, also darken the curved letters to add the affect of depth to the viewers eyes.

|
| I had also learned how crop with a moving object, so if something was to move in front of my text the text would be disappearing with the moving object |
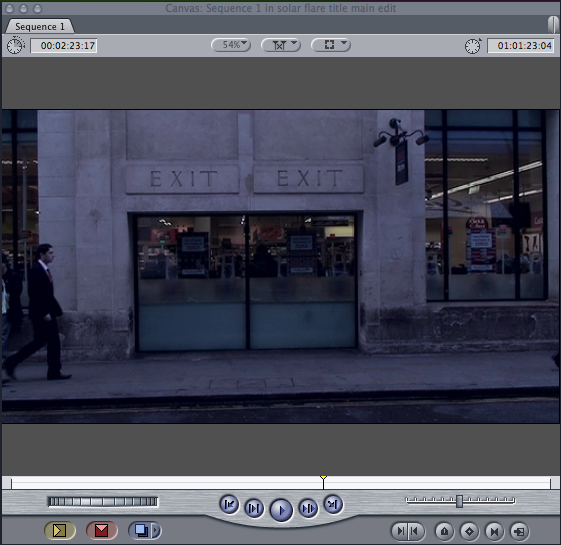

How it was done was by first cropping the text with the moving person then after that I would key frame the movement and carry on doing the same thing until the object or person has moved, this process animates the text, making it disappear with the moving object.

YouTube was used in order to upload and present our work to share with others, put into our blogs and to enable examiners to view our work in the most easiest and most convenient platform available for all to use and enjoy. Once we had finalised our various videos we uploaded each video onto our YouTube channels to enable the sharing ability that YouTube provides.
How to upload a YouTube video:
Step 1: Search for YouTube on your chosen search engine, the most commonly used search engine is google and thats the one we chose to use. Once searched select the first result that comes up on the results page. www.youtube.com
Step 2: Once selected sign into your google account which is linked to your YouTube account, this will then allow you to subscribe to other YouTube channels, leave comments and likes on YouTube videos and also allows you to upload your own videos which is the main feature that we used to ensure a successful viewing and presentation of our videos and final thriller opening title sequence.

Step 3: Once signed in you then select 'upload' which is situated on the top right hand corner of the page next to where the sign in button is. Here we was able to upload all our videos needed which will then allow us to upload our videos to our blog.
Step 4: Once your video has been uploaded onto your chosen YouTube channel it is ready to be watched by all and share on many different platforms.
Blogger:
As a group we used and created a blog page on blogger.com here we was able to type and upload all of our production group research and work. Blogger is a great way to present your work as it keeps it all organised in one place, it allows anyone to view and enjoy our blog on a whole variety of platforms which is convenient for all; especially the examiners.
How to use Blogger:
Step 1: Search for Blogger on your chosen search engine we chose google but any will work. Once searched select the first result that comes up on the results page. www.blogger.com
Step 2: Once clicked on blogger it will ask you to sign in to blogger using your account here you just simply sign in with your email and password to your chosen google account. Having to sign into blogger using google is really helpful because you also have to use google to sign into YouTube; this is helpful as it is easier to link your YouTube videos to your blog.
Once signed in all your blogs will be presented on the main screen all in one place which is quick, simple and convenient for all.
Step 3: Creating a new blog post is quick, easy and direct. You simply select the orange square icon with the white pencil inside. That will take you directly to a blank blog post which you can type away and add various hyperlinks, pictures and also embed videos directly from YouTube. That is why it is convenient for google to have the likes of YouTube and Blogger under the same log in.
Step 4: Once done and ready to present your work, you simply select publish in the right hand side in the orange box that says publish. And here you will be able to view the post on your blog.
Camera operation:
Without any prior knowledge other than "point and shoot", we were taught how to not only operate the camera in it's most basic of functions (insert/removal of battery and tape) but the various shot types, angles and techniques, how they are done and why they are used. The basic setup of a camera can be seen below, by Tanaka practicing the removal and placement of the battery:
This was given to us in the form of a briefing, in which we were shown how to safely and correctly perform basic tasks up until the point of switching on the camera as well as controlling white balance, exposure and focus of the videos we were taking.
Within lesson time, we learned the various shot types and angles and what messages these shot types and angles would give if they were used. For example, a closeup could show emotionally intimacy, significance or intimidation, depending on the angle of the camera. We did this through analysing clips of TV shows and films that did this effectively.
(Picture of me behind the camera, ready to shoot and Abi helping me secure the camera onto the tripod)
We then applied this to our film opening by using the angles and shot types to give the viewer the emotion we wanted them to feel by simply watching the opening. For example, the shot below, I wanted to make the viewer side with Abi as the protagonist, whilst creating mystery of who the watcher is. Which I did by using a closeup on Abi and shallow focus, obscuring the view of the watcher, George. This can be seen below:
Our retainment of knowledge for the skills used was based around revision. Our group revised the shot types and their uses full to gain a wide understanding for when we had our turn of shooting.
In conclusion, during the AS Media course, we have learned how to not only set a camera up for recording, but what shot types, angles and techniques (tracking, depth of field in focus) are and how we can use them in our own work to give a message or emotionally impact the viewer


